
Interface
Welcome Page
The project selection interface appears when the IDE is opened for the first time. You may open a project through two of the following methods:
- New Project: Create a new Mini Program scaffold or create a project through the demo template. It is used for development of new Mini Program.
- Select the file path of the existing local Mini Program.
- Select the recently opened project from the project records at the left side.
- Open project: Open the project file that exists in the local disk. You may choose one of the following two methods:

Project Creation Page
You may choose a blank template or the demo template available on the open platform for development.
We recommend you choose different demo template to know about the ability to be implemented by Mini Program. The demo templates are being updated continuously.
When the template is chosen, click Next to enter the project setup page.

Project Setup Page
In the project setup page, you need to set up the following options:
- Project name: Project name to be displayed in the IDE
- Project path: Location for saving the project in the disk
After the setup is completed, click Complete to open IDE.

Main Interface
The home interface includes Menu bar, Toolbar, Function panel, Editor, and Simulator.

Toolbar

The options in the toolbar are described in turn from the left to right.
- Associated application
One developer account can have multiple Mini Programs. After the account login, developers are required to associate the Mini Program under development. Associated application decides which code package will be uploaded to which Mini Program when you click to upload the codes.
2. Compiling mode
By default it is in normal compiling mode. In other words, the default refresh simulator will open the home page and not pass in any parameter. You may add custom compiling mode so that it starts from another page upon the simulator refresh with related parameters, which will increase debugging efficiency.

3. Refresh
Click the Refresh button to refresh the current simulator. Alternatively, when the modified code is saved, the simulator will refresh automatically.
4. Remote debugging
During the real machine debugging, it is possible to view the debugging information in IDE. For details see Debugging.
5. Preview
When the codes are pushed to the client temporarily, it is possible to see the real machine effect on cellphone. For details see Debugging.
6. Upload
On basis of the associated application, the Mini Program codes are uploaded to the Mini Program background. The uploaded version can be specified, if not specified, the current version is incremented by 1. (the current version must be greater than the previous version). After the upload is completed, a unique development version is generated in the Mini Program background.
For the version management standard and specifications, see Semver.

7. Details
You can check the related information of the current development environment. The fast build mode here is a new compiling mode.

Simulator
The simulator is the core function of IDE. The developer can use the simulator to simulate the real running environment for the Mini Program in client.

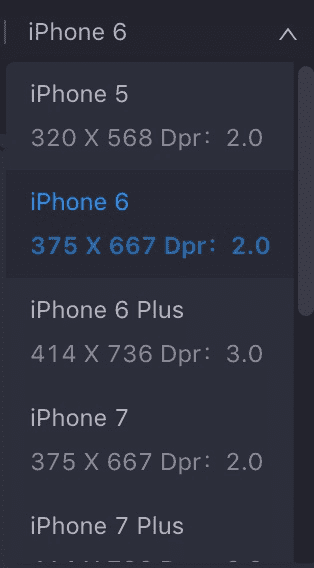
- Device switch
The developer can select different devices or add custom device to debug the adaptation problem of Mini Program on the models of different sizes.
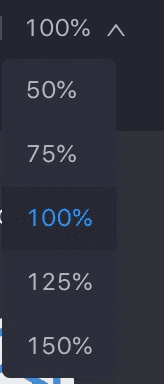
- Display scaling
The developer can scale the display of the simulator via preset percentages.
- Compiling log
Click it to open a compiling log window. It is generally used to troubleshoot compiling errors.
- Simulation screen
View the development result on the simulator screen.
- Path
It is the path address of the Mini Program page debugged by the current simulator.
- Page parameter
Parameter suffix of the current simulation environment.
- Device behavior simulation
During debugging in simulator, many operations on real cellphone, such as screenshot and shake, can be simulated in the mock panel.

Function Panel
- Directory tree
View or open the files in the current project
- Search
Search all files by using keyword.
- Git management
Common Git commands are integrated, and various Git operations can be done in a visualised manner.
- NPM package management
It is used to manage all packet dependency in a visual manner, and replaces the management in command line.